SSH keys, similarly to cryptocurrency keys, consist of public and private keys. You should store the private key on a machine you trust. The corresponding public key is what you will add to your server to secure it.
Be sure to securely store a secure backup of your private SSH key.
From your local machine that you plan to SSH from, generate an SSH key. This is likely going to be your laptop or desktop computer. Use the following command if you are using OSX or Linux:
Decide on a name for your key and proceed through the prompts.
Copy the contents of your public key.
Your file name will differ from the command below based on how you named your key.
Give the ssh folder the correct permissions.
Chmod 700 (chmod a+rwx,g-rwx,o-rwx) sets permissions so the user or owner can read, write and execute, and the Group or Others cannot read, write or execute.
Copy the contents of your newly generated public key.
Now log into the server that you want to protect with your new SSH key and create a copy of the pubkey.
Create a file and paste in the public key information you copied from the previous step. Be sure to save the file.
Now add the pubkey to the authorized keys list.
Once you've confirmed that you can login via the new key, you can proceed to lock down the server to only allow access via the key.
Edit sshd_config to disable password-based authentication.
Change PasswordAuthentication yes" to "PasswordAuthentication no" and then save.
Restart ssh process for settings to take effect.
For additional security node operators may choose to secure their SSH connections with FIDO U2F hardware security devices such as YubiKey, SoloKey, or a Nitrokey. A security key ensures that SSH connections will not be possible using the private and public SSH key-pair without the security key present and activated. Even if the private key is compromised, adversaries will not be able to use it to create SSH connections without its associated password and security key.
This tutorial will go over how to set up your SSH connection with FIDO U2F using a YubiKey, but the general process should work with other FIDO U2F security devices.
NOTE: More information on how to get started using a YubiKey can be found HERE. You should have a general understanding of how to use a YubiKey before attempting this ssh guide.
For SSH secured with FIDO U2F to work both the host and server must be running SSH version 8.2 or higher. Check what version of SSH is on your local machine, and your server by running:
It does not matter if there are mismatched versions between the host machine and server; as long as they are both using version 8.2 or higher you will be able to secure your ssh connection using FIDO U2F.
SSH key-pairs with FIDO U2F authentication use 'sk' in addition to the typical commands you would expect to generate SSH key-pairs with and support both ecdsa-sk and ed25519-sk.
YubiKeys require firmware version 5.2.3 or higher to support FIDO U2F using ed25519-sk to generate SSH key-pairs. To check the firmware version of a YubiKey, connect the YubiKey to your host machine and execute the following command:
To allow your host machine to communicate with a FIDO device through USB to verify attestation and assert signatures the libsk-fido2 library must be installed.
Generate an ed25519-sk key-pair with the following command with your YubiKey connected to your host machine (NOTE: you will be prompted to touch your YubiKey to authorize SSH key-pair generation):
You can now use your new ed25519-sk key-pair to secure SSH connections with your servers. Part of the key-pair is from the YubiKey, and is used to secure the SHH connection as part of a challenge-response from the devices.
In this section we will cover:
Logging In
Creating a new user
Disable root login
Disable password login
When you provision a new server, you will be provided a username, password, and ip address. Generally that username will be root. Let’s log in with them now in the form of ssh username@ip .
Initiate login to server
SSH into the server
2. Type Yes
3. Enter password
Logged into root
You are now logged into root. However, we do NOT want this as an option, so let’s fix it.
Since we no longer want to be able to log in as root, we’ll first need to create a new user to log into.
Create a new user
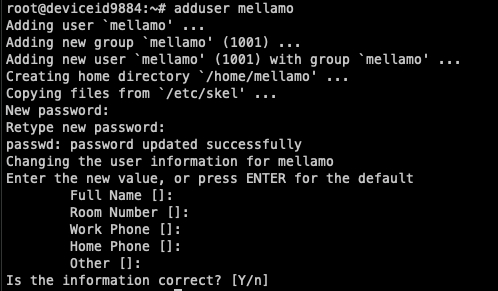
You’re going to want to choose a unique username here, as the more unique, the harder it’ll be for a bad actor to guess. We’re going to use mellamo .
You will then be prompted to create a password and fill in information. Don’t worry about the information, but make sure your password is complicated!
2. Give them sudo privileges
sudo is the name for “master” privileges, so we need to modify the user to add them to that group.
3. Verify user has sudo access
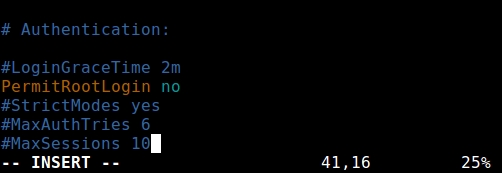
Disabling root login takes away an easy method for hackers to get in. The easiest way of accessing remote servers or VPSs is via SSH and to block root user login under it, you need to edit the /etc/ssh/sshd_config file.
From the remote server, open /etc/ssh/sshd_config
2. Save and exit sshd_config, then restart the service.
Return to you local machine.
2. Copy your ssh key to the server
3. Confirm you can login with just your SSH key
Done! You can now log in exclusively with your SSH key.
Now that you can log in with just your ssh key, you should now disable password login.
Return to your remote server, and open /etc/ssh/sshd_config again
2. Find ChallengeResponseAuthentication and set to no:
3. Next, find PasswordAuthentication set to no too:
4. Search for UsePAM and set to no, too:
5. Save and exit sshd_config, then restart the service.
Congratulations! You can only login with your ssh key now. Be sure to back it up in case something happens to your machine!
Create user mellamo
Testing sudo privileges
Set PermitRootLogin to “no”
Log out of server
Copy keys
Log in with SSH key
Never save your validator’s keys on the remote server. You should be using your local machine and saving your keys on there to broadcast to the remote server.
In order to use a local CLI, you must:
Install the daemon on your local machine by going through the normal installation process
Set the daemon’s config to the remote server
To add basic security to your node, we've provided a guide covering 2 simple tools.
Uncomplicated Firewall (UFW)
Key-based SSH authentication.
Within the #Cosmos, conversations around node security tend to start with whether or not you use backup servers, sentries, and a remote-signing key management solution. This does not see the forest for the trees. While those steps are certainly important, they are *final* security steps. We should instead be discussing the first steps you make when setting up a new Tendermint node; raise the floor of security, rather than the ceiling, if you will.
This is intended to be a very basic guide on Linux security practices. If you want to more in-depth information, you can read about it here.
The following topics will be covered: 1. SSH Key Setup
2. Server Configuration
3. Setting up a Basic Firewall
4. Using Local CLI Machinesbas
When you receive your server, you will be provided a root user login, and a password. You’ll be inclined to log in with that login and password, but we have steps before we do that! We first want to create out ssh key as we’ll be disabling password login shortly.
An SSH (Secure Shell) key is a way to identify yourself as a user without using a password. It has 2 parts: the pubkey and private key. When you create the SSH key, you give your pubkey to a computer you wish to log into. You can then “show” the server your private key and it will admit you automatically. This makes it far more secure than a password, as then only you will have access to the server via your key.
This document assumes you’re using a Mac. If you need instructions for Linux or Windows, see the Github instruction for generating an SSH key.
Open Terminal
Generate the SSH key:
3. When you’re prompted to “Enter a file in which to save the key,” press Enter. This accepts the default file location.
4. At the prompt, type a secure passphrase. For more information, see “Working with SSH key passphrases.”
Your SSH key is now created, but we have to add it to the agent for it to be usable.
Start the ssh-agent in the background
2. Open your SSH config file
3. Add the following text block to your file
4. Add your SSH key to the ssh-agent
Your SSH key is now set up! This only has to happen once, so you can skip this if you need to refer back to this document.
Uncomplicated Firewall (UFW) is a program for managing a netfilter firewall designed for easy use. It uses a command-line interface (CLI) with a small number of simple commands and is configured with iptables. UFW is available by default in all Ubuntu installations after 18.04 LTS, and features tools for intrusion prevention which we will cover in this guide.
Start by checking the status of UFW.
2. Enable SSH
3. Enable p2p
This is the default p2p port for Tendermint systems, but if you’ve changed the port, you’ll need to update the ufw setting.
4. Enable UFW
5. Confirm UFW is enabled
Note that at any time you can disable ufw by doing:
Generate SSH key
Open ~/.ssh/config
Check UFW status
Confirm UFW is enabled
Uncomplicated Firewall (UFW) is a program for managing a netfilter firewall designed for easy use. It uses a command-line interface (CLI) with a small number of simple commands, and is configured with iptables. UFW is available by default in all Ubuntu installations after 18.04 LTS, and features tools for intrusion prevention which we will cover in this guide.
Start by checking the status of UFW.
Then proceed to configure your firewall with the following options, preferably in this order.
The order is important because UFW executes the instructions given to it in the order they are given, so putting the most important and specific rules first is a good security practice. You can insert UFW rules at any position you want to by using the following syntax (do not execute the following command when setting up your node security):
The example command above would be placed in the first position (instead of the last) of the UFW hierarchy and deny a specific IP address from accessing the server.
This sets the default to allow outgoing connections unless specified they should not be allowed.
This sets the default to deny incoming connections unless specified they should be allowed.
This allows SSH connections by the firewall.
This limits SSH login attempts on the machine. The default is to limit SSH connections from a specific IP address if it attempts 6 or more connections within 30 seconds.
Allow 26656 for a p2p networking port to connect with the Tendermint network; unless you manually specified a different port.
Allow 1317 if you are running a public LCD endpoint from this node. Otherwise, you can skip this.
Allow 26657 if you are running a public RPC endpoint from this node. Otherwise, you can skip this.
This enables the firewall you just configured.
At any point in time you can disable your UFW firewall by running the following command.


